The steps to localize items in CorasWorks components are provided below.
1. On
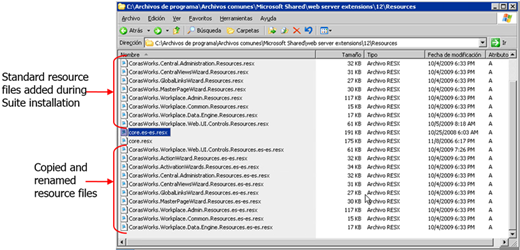
each server, go to the following location and find the core file that was
loaded when the language pack was added to the server:
program files\common files\Microsoft
Shared\web server extensions\12\Resources
2. Note the extension at the end of the core file. For example, when the Spanish language pack is added, a file called core.es-es.resx is loaded. The extension to note in this example is “es-es”.
3. Make a copy of all of the CorasWorks resources files (installed in the same location when the Suite was installed) and then rename each copy with the extension noted above. To continue the example of Spanish, the copied files would be renamed as shown in the figure below.

4. Open the desired renamed resource file in Notepad or another editing program.
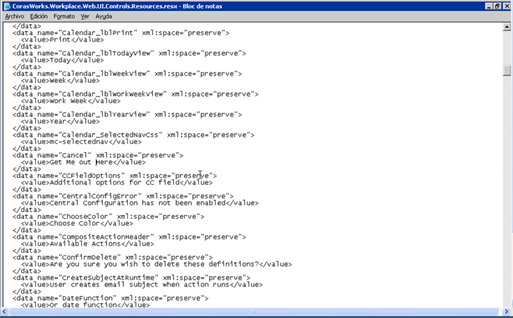
•All of the displays reference the CorasWorks.Workplace.Web.UI.Controls.Resources.resx file, so in this example you would open CorasWorks.Workplace.Web.UI.Controls.Resources.es-es.resx
•Each builder wizard references a separate file (e.g., the Actions Wizard references CorasWorks.ActionWizard.Resources.resx, so in this example you would open CorasWorks.ActionWizard.Resources.es-es.resx)
5. Locate the label you want to localize and make the desired change between the <value> tags. For example, in the figure below, to change the text shown on a Calendar Display’s Print button, replace “Print” (near the top of the figure) with the desired text.

6. Make all of the desired changes throughout the file(s) and then save them. Repeat these steps for each of the desired resource files.
7. Initiate an IIS reset to have the changes take effect. The next time a user or builder accesses a CorasWorks Display on any site on the server that utilizes the associated language, they will see the changes made above.
NOTE: These procedures can also be used to modify the standard, English text used by CorasWorks components. Instead of making copies of and renaming the resource files for a language, simply make the desired changes to the original resource files. However, if you choose to do this, you should be aware that when the Suite is reinstalled or upgraded, the installation process overwrites resource files; they are not appended. You will want to make a copy of your modified files.