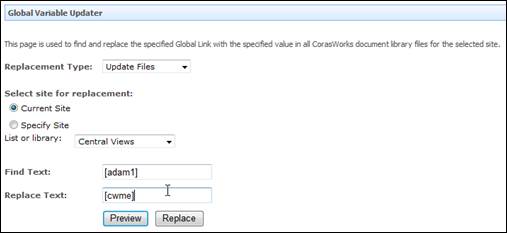
Once its Site Collection Feature has been activated, the GVU can be accessed from the lower part of Site Settings page, in the CorasWorks Application Wizard area. When initially accessed, it similar to the example below.

1. Use the Replacement Type drop-down to select either Update Files or Update Webparts.
•Choose Update Files if you want to update the global links in an actions library, central views library, or any other document library that includes references to global links.
o For example, if you choose this option and update global links in an actions library, the GVU will look at all of the action definitions in that library and update all properties that reference the global link identified below in Step 3.
•Choose Update Webparts if you want to update the global links in all of the CorasWorks displays (Grid, Calendar, Chart, and all Navigation Displays) on the current site. This will cause the GVU to look at all local views in all displays in the current site that reference the global link identified below. Proceed to Step 3.
2. If you chose Update Files, the standard method to select a library is shown. Use the radio buttons and drop-down to identify the library that contains the references to global links that you want to update.
3. In the Find Text area, type the global link that you want to update and place it within brackets.
NOTE: It is important to note that this “find” is case-sensitive. For example, if you have the GVU look for “[Project abc]” it will not locate any global links called “[Project ABC].”
4. In the Replace Text area, type the new global link that you want to use in place of the global link identified above. A sample is shown here.

5. Select the Preview button. This allows you to see which global links will be affected by the potential update. A table at the bottom of the page states all of the properties where the identified text was found and the current content of each property.
6. The first column in the table is used to identify which properties should be updated. If a property should not be updated, simply clear the mark from the checkbox to the left.
7. When you are ready to proceed, select the Replace button. A confirmation message is displayed.
8. Click OK to clear the message. The page is updated with a table that lists all of the replacements made in the web parts or the selected library.