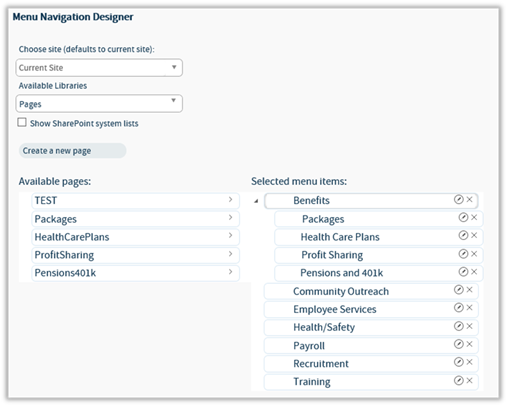
The Configuration -> Menu Navigation Designer page is available when the view type is set to Menu Designer. It provides a graphical interface allowing the builder to pick and choose the pages to include in the Menu Navigation display.

Note: While the majority of users will opt to choose a navigation page library within the current site, the Menu Navigation supports multiple libraries and locations. When choosing multiple sites for the library or libraries with pages, be aware of the following:
•You can select from any number of sites or site collections on the server where the Data Display is installed or even another server.
•You can select multiple site collections.
•However, the more levels of sites you include, the greater the impact on performance. CorasWorks recommends that you include only the number of sites that you need in the display.
The first two fields of the Configuration -> Menu Navigation Designer page determine the location of the pages for the navigation. The selected library can be empty as pages can be created and placed into it. In addition, pages can be pulled from multiple libraries although only a single library can be displayed for inclusion at a time. In short, select a library, add the required pages to the navigation, then select another library and add its pages.
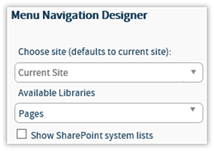
1. The Choose Site option is used to identify the site of the list that you want to include in the Data Display. The site selection choices are:
•Current Site – (Default) Pull the data from the current site.
•Current Site Collection – Pull the data from the current site collection.
•Global Variables – Pull data from the URL defined in the selected Global Variable.
•CW Variables – Pull data from the URL defined in the selected CorasWorks Variable. The variables are:
o [CurrentPageFolder]
o [CWSiteURL]
o [ISiteURL]
o [ReferringPage]
o [SiteURL]
o [WebRoot]
•Web Application – Pull data from sites and subsites within the current web application.
•Farm – Pull data from sites within other web applications within the current SharePoint farm.
2. Once
the site is located (or when using the default site location) the Available
Libraries field will be populated with the libraries available for selection
for the Menu Navigation.
By default, only user created or site
libraries are included in the drop-down. To select a SharePoint system
library such as Master Page Gallery or Style Library, enable the Show
SharePoint system lists option.
3. Within the Available Libraries field, choose a library for the Pages. Changes here will impact the Available Pages field located lower in the page.
Once the library is selected within the Configuration -> Menu Navigation Designer page, the available pages are displayed at the bottom of the page. Available pages are dragged and dropped into the selected section to be added into the navigation.
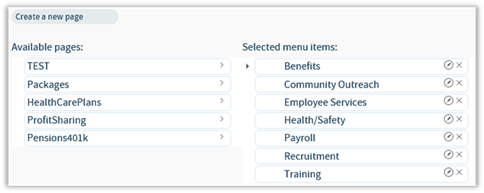
1. The Available pages section displays the pages that are available to be added into the navigation, based on the library selected earlier.
2. To
select the pages for display, drag them from the Available pages section
into the Selected menu items section. The resulting menu structures
will be displayed, from left to right, in the same order as they are displayed
in the Selected menu items section, from top to bottom.
That is,
the first item in the listing is displayed left-most in the Menu Navigation, the
last item in the listing is displayed right-most in the Menu Navigation, and all
other items falling in between based on their position.
3. To remove a page from the navigation, click on the “x” to the right of the title. This should return the page to the Available pages section.
4. To change the order of the navigation items, drag them from their current position to its new position. When dragging the column, click on its title and drag it to a new location between the titles of the other items.
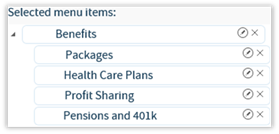
5. The Menu Navigation Designer supports two levels of navigation: tabs and the menu within the tab.
•To add a menu item under a tab: Drag and drop the page ONTO the tab that it is to appear under.
•To expand a tab to see its menu: A tab with menu pages will have
an expand indicator ( ) to its left. Click on the indicator to
open the listing.
•To reorder pages within the tab’s menu: The pages within a tab can be dragged for reordering. The order of display (from top to bottom) is their order of display within the Menu Navigation.
•To move a page back to a tab: Drag the page from the menu listing and drop to the same levels as the tabs.
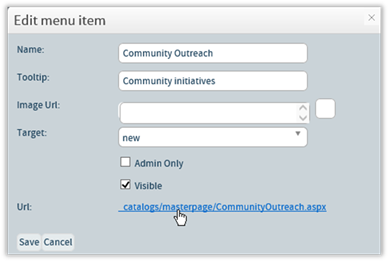
6. Once a
page is in the Selected menu items section, click on its Editing
Icon ( ) to modify its display information. The
following changes can be made within the Edit menu item window:
•Name: This is the name displayed within the Menu Navigation structure.
•Tooltip: Blank by default. Add text here for display when the mouse pointer is hovering over an item.
•Image URL: Blank by default. Add a URL to the location of an image to be displayed within the menu of a tab. The URL can be relative and will be displayed to the right of the field.
•Target: Use this drop-down to specify the window in which linked items should be displayed. The default option is same, meaning the resulting page loads in the same browser window. The new selection opens in a new browser window, while the same, no frame option will open the link in the same browser window but also outside of any frames.
•Admin Only: Unchecked by default. Place a check in this field if the item should only be displayed to Administrators. This is a hiding mechanism within the navigation and does not prevent general users from accessing a page if they know its URL.
•Visible: Checked by default. Uncheck to keep the navigation item in the menu structure but unseen. This is a good option when building a navigation structure, prior to the page being made available to all users.
7. Once the changes to the navigation item is completed, click on the Save button to update the item or click on the Cancel button to abandon the changes.
By default, the pages being used in the navigation are from the selected library. If the library is blank or if more pages are needed, they can be created through the Menu Navigation Designer.
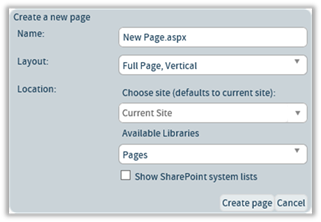
8. Within the Configuration -> Menu Navigation Designer page, click on the Create a new page button. The section will expand.
•In the Name field, replace the “New Page.aspx” with the name of the page. The .aspx is NOT required, as the builder will automatically add this extension.
•In the Layout field, choose the type of SharePoint web part page to create. The options are:
o Full Page, Vertical (default)
o Header, Footer, 3 Columns
o Header, Left Column, Body
o Header, Right Column, Body
o Header, Footer, 2 Columns, 4 Rows
o Header, Footer, 4 Columns, Top Row
o Left Column, Header, Footer, Top Row, 3 Columns
o Right Column, Header, Footer, Top Row, 3 Columns
•The Choose Site option is used to identify the site of the library where the page should be saved. The site selection choices are:
o Current Site – (Default) Pull the data from the current site.
o Current Site Collection – Pull the data from the current site collection.
o Global Variables – Pull data from the URL defined in the selected Global Variable.
o CW Variables – Pull data from the URL defined in the selected CorasWorks Variable. The variables are:
§ [CurrentPageFolder]
§ [CWSiteURL]
§ [ISiteURL]
§ [ReferringPage]
§ [SiteURL]
§ [WebRoot]
o Web Application – Pull data from sites and subsites within the current web application.
o Farm – Pull data from sites within other web applications within the current SharePoint farm.
•Once the site is located (or when using the default site location) the
Available Libraries field will be populated with the libraries available
for selection for saving the file.
By default, only user created
or site libraries are included in the drop-down. To select a SharePoint
system library such as Master Page Gallery or Style Library, enable the Show
SharePoint system lists option.
•Within the Available Libraries field, choose a library for your page.
9. Once the page settings are set, click on the Create Page button to create the new page. The page will automatically be added into the Selected menu items section, ready to be moved into the appropriate position within the navigation.
10. To create another page, reproduce these steps. When completed, click on the Cancel button to collapse the Create a new page section.
11. Once the
changes have been made, click on the Apply icon ( ) at the top of the page in order to save
them.
12. To modify more items, select the appropriate listing along the left side of the page.
13. If all changes are
completed, click on the Apply changes and exit icon ( ) found at the top of the page. The
component changes will be saved and you will be returned to the original web
part page.
14. Click on the
Home icon ( ) found at the top of the page. The
browser will return to the original Display Wizard page.