1. Stop all of the application pools that SharePoint is using except for Central Administration’s application pool.
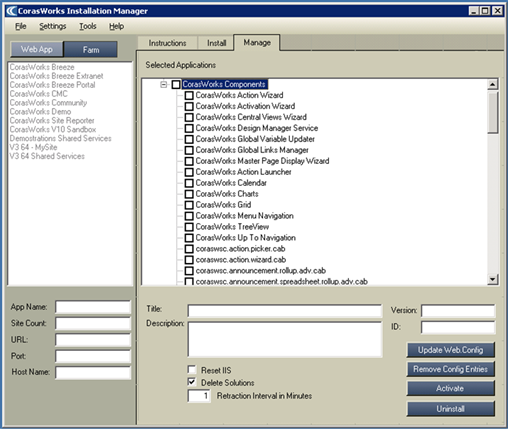
2. Go to the Installation Manager’s Manage tab, shown below, and then use the Web App or Farm button to select the scope of the location from which you want to uninstall components.
•The Farm scope selection is recommended if v11 is being removed permanently from the environment or for upgrade purposes.
Figure 17: Installation Manager
Manage Tab
3. Place a check mark next to each component that you want to uninstall. As with installation, if you place a check mark next to an upper level item, all of the components listed under it will be selected automatically. In the example shown above, if you were to select CorasWorks Components, all of the components from the Actions Wizard through Up To Navigation would also be selected.
•Note that if you select an individual component, its Title, Description, Version, and ID number are displayed at the bottom of the screen. If you cannot see the entire description, you can resize the window.
4. Make sure the Delete Solution checkbox is not selected.
•With the Delete Solution checkbox unselected, the uninstall will retract the solutions from all of the web applications
5. The Deployment Interval in Minutes property is used to identify the number of minutes the Installation Manager should wait between each of the processes for each component. CorasWorks recommends that this be set to 0 and then increased if needed.
6. When you are ready to proceed, click the Uninstall button at the bottom of the window. A progress window is displayed.
7. When the uninstall is complete, the progress window states All operations successfully completed and OK and Close buttons are displayed.
•Click Close to close the window.
•Click OK to close the window and open Central Administration to review the retraction process.
8. If you click OK, the Central Administration Solutions Management page will open in a browser window. Refresh the page to track the status of the SharePoint retraction process. If the retraction does not seem to be progressing, it may be necessary to restart the Timer service(s).
9. Back in the Installation Manager, place a mark in the Delete Solution checkbox.
•With the Delete Solution checkbox selected this time, the uninstall will delete the solutions out of the Solution Store.
10. The Reset IIS checkbox is selected by default. When this option is enabled, once the selected components are uninstalled, the Internet Information Server (web server) will be shut down and restarted without rebooting the physical server. Since SharePoint depends on IIS, in effect this also restarts SharePoint. This is required to remove the DLLs from memory.
•The SharePoint Timer Service may be restarted one or more times during the uninstall process.
11. Click the Uninstall button one more time.
12. Click OK when finished.
In some rare cases, the entries added to the web applications’ web.config files during installation may not be removed when components are uninstalled. If this occurs, open the Installation Manager, access the Web.Config Utility (see page 30), and check the v11 entries for removal.
If you are permanently removing v11 and have no other CorasWorks software installed in your environment, you can check the Select All checkbox and click on the Remove Selected Modifications button.