Before you begin, please ensure that the individual installing the Installation Manager has local administrator rights on the server.
The Installation Manager should be installed onto the web front end server containing Central Administration.
1. When
you download v11.4 from the CorasWorks download library, you will have a .zip
file that contains a Setup folder with a setup application for the Installation
Manager, plus several other folders that include the v11 components.
Extract the .zip file to a location of your choice. It will create an
upper-level folder called CorasWorks Version 11.
Note: Do not install the Installation Manager or any of the components from
a shared network drive.
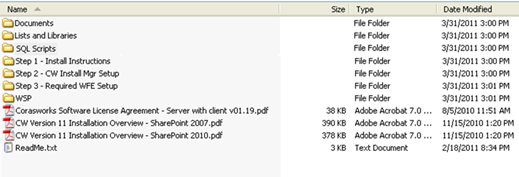
2. Locate the CIM_Setup_SP2010.exe file for the Installation Manager in the Step 2 - CW Install Mgr Setup/CIM_Setup_SP2010 folder, right-click on it, and choose to run as an Administrator.
Figure 1: Select “Step 2”
Folder
3. A welcome screen for the Installation Manager InstallShield Wizard is displayed. Click Next to view the License Agreement.
4. Make sure the button labeled I accept the terms of the license agreement is selected, and then click Next again. A window is displayed with prompts for your user name and company name.
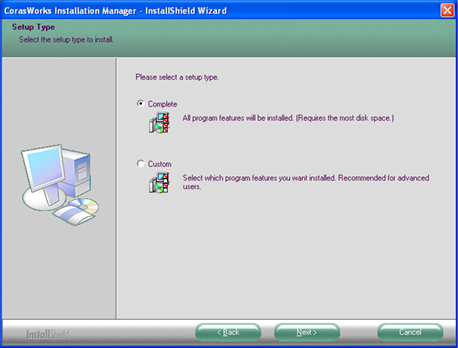
5. Provide the requested information and then click Next. The page shown below is displayed.
Figure
2: Select Setup Type
6. Click Next to accept the default setup type. A confirmation page is shown next, verifying that you want to begin the installation.
7. Click Next again to proceed with the installation. The next page includes a status bar to show the progress of the installation.
8. A completion message is displayed when the installation is complete. Click Finish to close the window.
9. Next, you need to access the CorasWorks Installation Manager. Click on the Installation Manager icon on the desktop or select the following:
Start >> Programs >> CorasWorks >> CorasWorks Installation Manager
10. A screen like the one shown below is displayed, while a series of tests is performed.
11. The Installation Manager is now installed. Before you proceed to the next section to install the v11 components:
•Verify that the SharePoint Timer Service and the Administration Service are started on all web servers.
•Stop all of the application pools except for the SharePoint Central Administration application pool. If you have a web farm, you will need to stop the application pools on each of the front end web servers.
o The Central Administration application pool should be kept running to monitor the deployment process
o Procedures for stopping and starting application pools on IIS 7 can be found here: http://technet.microsoft.com/en-us/library/cc732742.aspx