The process to execute an action is a simple one:
1. Place a check mark in the box to the left of each item in the display that you want to work with. If you want to execute the action against all of the items on the current page, place a check mark in the box at the top of the first column.
2. Select the desired action from the Actions drop-down in the toolbar, or right click to access the context menu and select the action from the menu.
3. Click Go.
If the action is a Delete List Item-type action, a confirmation message is displayed before any items are deleted.
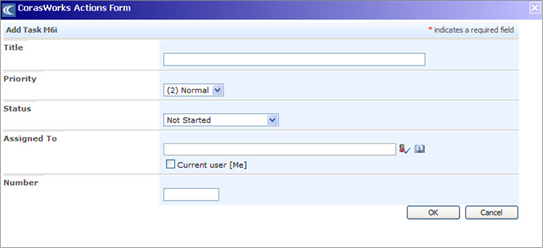
If the action definition includes any values that are set to “Value entered by user”, an entry form is displayed as shown in the example below. Any required fields are marked with a red asterisk (*). When you are finished entering the necessary information, click OK at the bottom of the form.
o You can resize the entry form or move it anywhere in the browser window if it is blocking something that you need to see.
If the selected action is a Chained Action and user input is required for the next action, there will be a Next button at the bottom of the entry form.

TIP: By using an entry form, a user can be in one site and write to another one, without even knowing where that destination site is. They do not access an edit page and see all of the columns in the list; they only see the columns they are being asked to enter. The person defining the action controls what information is added and what gets changed. The user only sees as much information as the action provides. If the entry form includes a user selection drop-down (e.g., Assigned To), the users are pulled from the site collection’s user list, not the individual site’s user list.
4. When the action is complete, the Grid Display is shown.
•If all items succeeded and the action definition specified that a success message is to be shown, then that message is shown at the top of the display. Otherwise, you are simply returned to the display.
•If any items failed, the failure message stated in the action definition is shown at the top of the display. Additional SharePoint error messaging will also be displayed if that option was selected in the action definition.
NOTE: Please do not refresh the screen or use your browser’s Back or Forward button until the action has finished executing.
Actions can fail for a number of reasons:
•If Central Configuration is enabled within an environment, all users must have at least Visitor permission to the Central Configuration site. This allows the components to validate what the user can see.
•The columns referenced in the definition may not in exist in the source or destination list(s).
•The user may have insufficient access to one or more of the lists in the display. Users must have a minimum of Contributor access to a destination list in order for an action to succeed in creating, modifying, or deleting items in that list.
•If a user attempts to execute an action and the list identified in the action definition is not available, the following error message will be displayed:
List [list name] does not exist on this site