Assuming you have site administrator permission you will be
able to customize your widget to meet a more precise need. This is a
pretty simple process but you can learn more about what is possible to customize
through the Display Wizard by reviewing the appropriate online help topic based
on what type of Widget it is (e.g. Grid, Calendar, Chart, and Navigation).
Let’s look at how to access the Wizard and the high level basics of
it.
To customize your Widget you will of course want to make sure
you have already added one or more Widgets to your page. Then you will
want to select the Widget that you will want to modify. Now you are ready
to start! Here is how to do it:
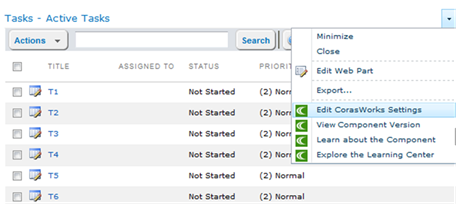
1. Put
the page in edit mode (see adding a Widget to your page for instructions) and
select the Web Part Menu in the top right hand corner, then select “Edit
CorasWorks Settings”.
2. The
Display Wizard will pop up on your screen and you will see something similar to
the following: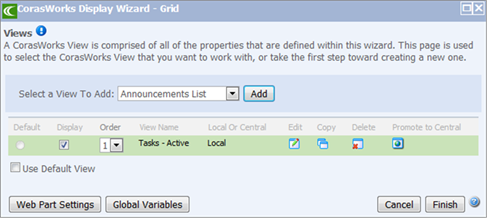
Let’s explore what you are
seeing. Each Widget is really a pre-configured CorasWorks Basic Component
(In our example you can see it’s a Basic Grid based in the top left of the
window). Each component can actually have multiple views that the business
user can select from. In this case we only see one which is Tasks –
Active. If there were more we would have seen multiples
views.
From here you can add a standard view to the Widget by
selecting it from the drop down and clicking Add. You can also Edit a
specific view, copy a view to create a new view based on the current view, or
delete the view if you decide you don’t like it……no worries if you do….remember
you can always add it back from the web part gallery. If you want to know
about Central Views and what the “Promote to Central View” does, see the Central
Views Wizard location of the online help under the Basic Components
section.
3. Now
let’s assume you clicked the Edit icon and talk about what you will see.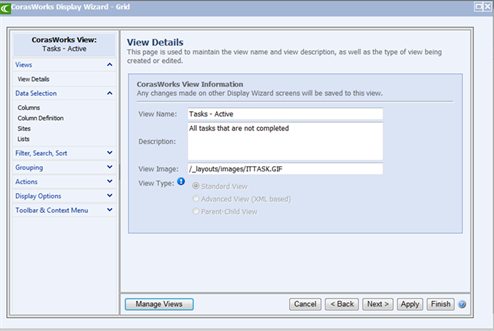
Within the View editing pages
you will be able to change everything about the view that you are editing.
On the landing page you can change the Name, Description and point to a new
image if you happen to know the location on the server for it. The reason
that the View Type is greyed out is that once a view is built, this value can’t
be changed. We have also expanded the Data Selection section of the Wizard
to talk through those options
4.
Clicking on the Columns you see: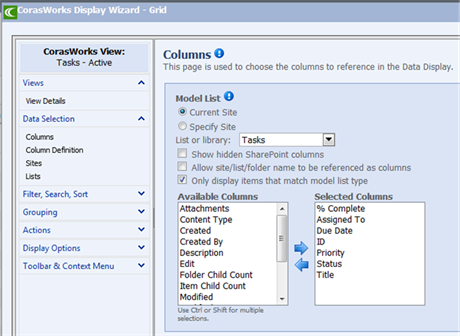
From here you can change the
list or library type (say you want a similar display but showing tickets from a
customized task list that you created) and add or take away columns that the
orginial list contains based on your desired result. Clicking Next at the
bottom will take you to the next page which is the Column Definintion
page.
5. The
Column definition page looks like this: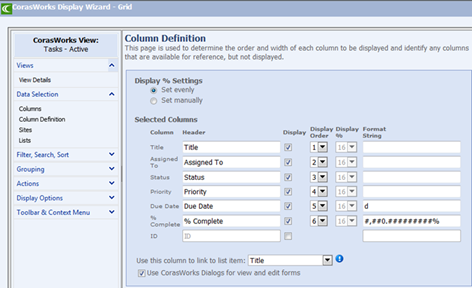
On this page you can choose
the way that the display will look. Which columns will display for the
business user, how it’s spaced, and even change the data format. As you
learn more about CorasWorks you will find the Wizard concept is consistent
across all Basic components. Clicking next will take you to Sites and then
Lists where you can choose a different site or sites that you want to bring back
data from.
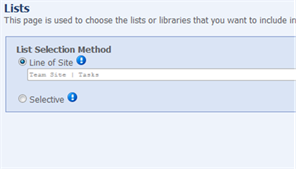
6. The
Sites and Lists pages allow you to select the location CorasWorks will use to
start looking for content that will match the settings from the Display
Wizard. You can point to any site in the web farm and also choose to
search a certain number of levels below that site. The aggregation is
called a Roll-up and CorasWorks made them famous! You also can select
specific lists in cases where you don’t want to bring back multiple lists that
match. 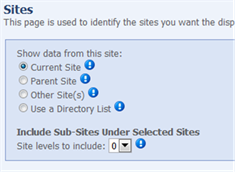
7.
Explore the rest of the options! You will find options for grouping,
sorting, filtering, adding Actions, conditional formats, etc. You can read
more about all of that in the appropriate section in the online help.
8. Click finish whenever you have your desired setup and start working away at your actual business work!