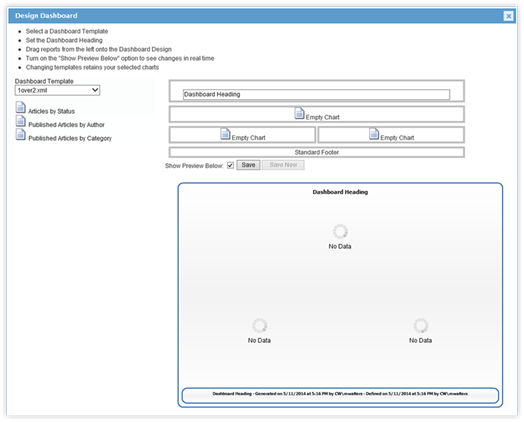
Prior to creating a Dashboard, ensure there are Report Widgets built. Some Dashboard types require five charts to populate the interface. Once this goal has been met, start the Dashboard creation process.
1. Within the Dashboard section, click on the “New Dashboard” link. The Design Dashboard panel will open.

2. Along the left side of the panel, choose the Dashboard template. These are the layout files for the Dashboards and include:
•1over2.xml: Three charts, one on top and two below. Generation footer included that has title and build information included.
•2over2.xml: Four charts, two on top and two below. Generation footer included that has title and build information included.
•3over2.xml: Five charts, three on top and two below. Generation footer included that has title and build information included.
•2in16040.xml: Two charts, presented at the same level. Generation footer included that has title and build information included.
•3over2NoFooter.xml: Five charts, with three on the top and two underneath. No footer with generation information included.
3. Once the Dashboard Template has been selected, drag the Reports (listed underneath the Dashboard Template section) to an “Empty Chart” field in the top right corner. The number of chart fields will differ, depending on the Dashboard Template selected.
4. Type the name of the Dashboard into the “Dashboard Heading” field. This name is also the name of the resulting Dashboard Widget.
5. When the charts and heading information has been supplied, click on the Save button.
6. Close the Design Dashboard panel when completed by clicking on the blue X in the top right-corner of the panel.